søndag den 18. maj 2014

Apple MacBook 4,1

Gimme more white plastic!


My MacBook running this blog
I Always wanted a MacBook to complement my Mac Mini, just couldn't justify the price tag. Now I finally own one, and this one came with a very attractive price tag! Seller stated that it was slow and it had been used by her children who found it to be way too slow. Furthermore, it was bought in America, so it lacks danish characters "ÆØÅ", it had an american power plug and it would not eject CDs. It went ahead and bought it anyway for 60 €. A good price I think...

The computer had the game "Sims 3" installed, and I suspect this is why they considered it slow... I suppose it's not a modern game machine! It had 1GB of ram, a 120 GB hard drive and a 2.1 ghz Intel Core 2 Duo processor. I reformatted the hard drive and found a good deal on 4 GB of ram on the used marked. This made a huge difference in performance. Also upgraded to OSX 10.7 Lion instead of 10.5 Leopard. Next I upgraded the hard drive to a 120 GB SSD drive from eBay. Still not a lot i suppose, but enough for my needs and for a reasonable price. 

Last problem was the combo drive that would not eject CDs or DVDs. That turned out to be an easy fix! I put a flathead screwdriver in the slot, gave it a gentle twist and that's it! It's now in perfect working order!

All in all this was a very sweet deal and I'm very happy with it. The extra ram and the SSD made all the difference in the world, and for daily use, it does not feel like a 6 years old computer.
With accessories and upgrades, this MacBook cost me 138€. Nice!


A 7€ bluetooth Mighty Mouse
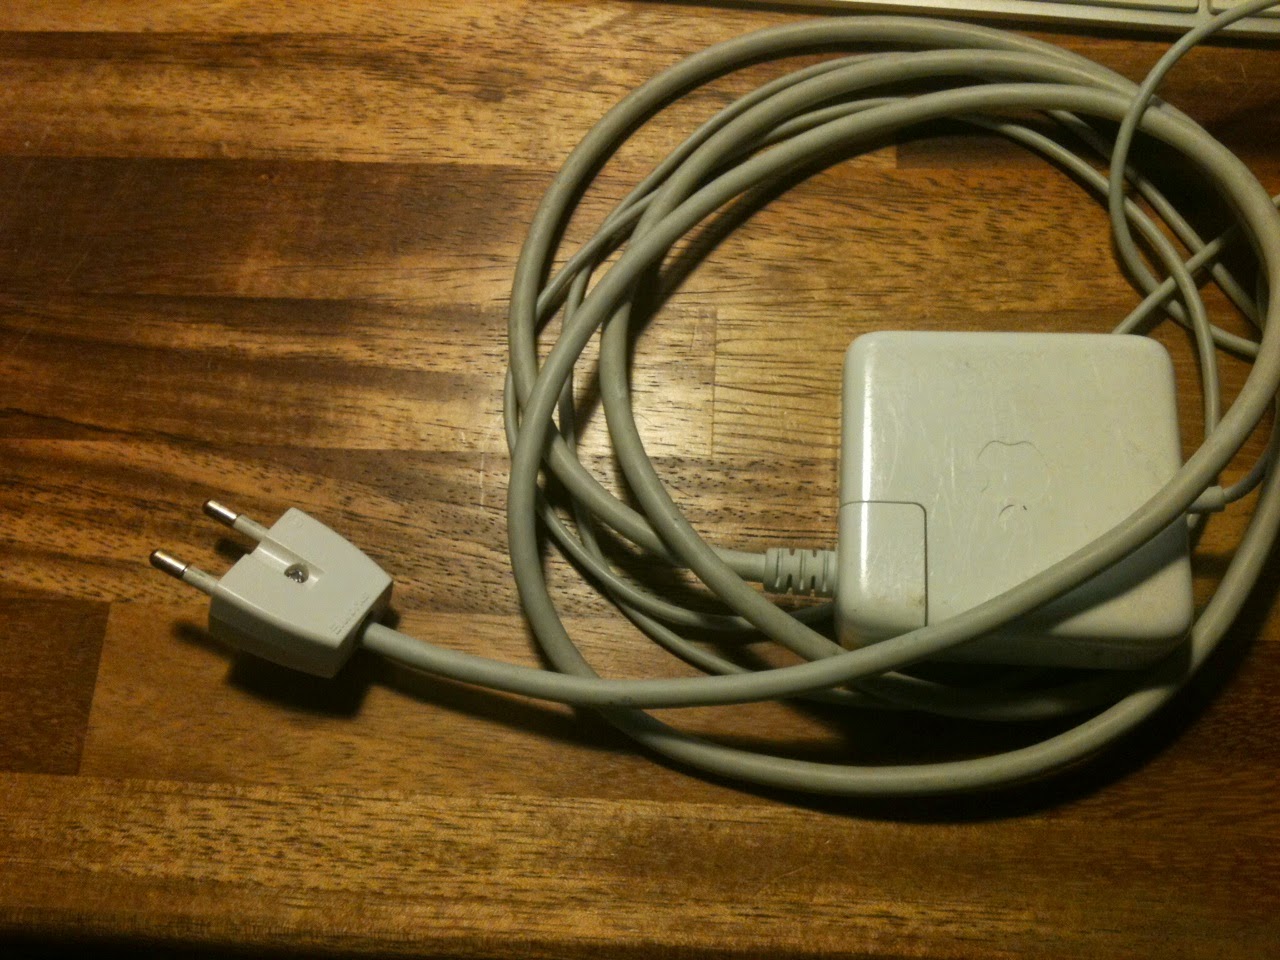
American power plug exchanged for a
danish two prong power plug


Looking good in white plastic :-)
Very nice blue 4€ sleeve from eBay!

Roland line mixers

Got really lucky this time!

As my (still small) collection of synthesizers is starting to grow, I found myself in need of some line mixing capabilities. So I started searching the used marked for a rack mountable line mixer, preferably of good quality, fair price and same age as the synthesizers.

And all of a sudden, there it is! Someone is giving away not only one, but two Roland line mixers for free! The M-12E is a 12 channel mixer with two band eq, aux bus, effect send and balanced outputs. The M120 is a bit smaller, with only basic mixing functions, taking up just one rack unit.

The ad said that both mixers were noisy and in need of some tender love and care. Obviously, since they were free, I was up for the challenge, despite my somewhat limited electronics skills… I picked up the units and opened them up on my desk. The M-12E had noisy pots, so I cleaned them up with contact spray and put the unit back together. Now it's all good and working perfectly in my rack!

Roland M-12E
Roland M-120


The M-120 is a different story… When I turned it on and tested, 5 out of 12 channels were dead. I opened up the unit and found that some traces on the board had been cut. Maybe to silence the dead channels completely, who knows… I repaired the traces with some wire and tested the unit again. This time two channels came back to life, so I wonder why they were cut from the circuit… That leaves me with 3 dead channels that only output noise. I suspect dead op amps, but it's just a guess, since i don't have the knowledge or equipment to test the op amps. At some point I will try replacing the op amps on the dead channels and see if it will resurrect them. I'll post an update when I get back to that project at some point. I'm not in a hurry right now, since I still have two free inputs on the M-12E :-)

At some point it would be nice though to get the M-120 fixed. I believe the M-12E has an extra input bus used for expansion, that can be connected to the M-120 resulting in an expansion by 12 channels.
Here is a picture of the partly faulty/fixed (depends on how You see it!) M-120 board:


Roland M-120 line mixer in it's current state...

Traces cut and repaired with yellow wire


If you have any word of wisdom about faulty op amps or other components that can be the cause of dead mixer channels, then please let me know!

Small update!

Just ordered some op amps from eBay. Will post an update when they arrive and I get around to testing if that is the problem...

Update


Finally got around to changing the op-amps, and that was indeed the problem on all three faulty channels. Now all 12 channels are fully functional!
In addintion I removed the ugly yellow wires and repaired the broken traces with solder. A much neater solution.
Upon further inspection, I found the the headphone output is also faulty with lots of noise... I only ordered three op-amps on ebay last time, so now I have ordered some more, hoping that that this is also the culprit in this situation. There are two different types of op-amps near the Headphone jack, so  it will be trial and error again! At the moment my only method is cutting of the suspected op-amp and then desoldering the pins individually. Then fitting the new component, leaving the old one useless... Well, they don't cost much on ebay...

Another Update!

Solved the last issue, the noisy headphones output, on the M-120. As it turned out, after replacing  additional six op-amps of two different types, that was not the problem in this case... Well, with three dead op-amps out of 12 channels I guess there is no harm done in changing some op-amps. I suppose they will live longer than the old ones...
Instead i googled the problem (which I probably should have done in the first place...) and found that the headphones out on the M-120 is born noisy and very loud! I then figured that if I could make the output quiter then I would probably loose some of the noise. So after experimenting I found two spots (left and right channels) that would benefit from adding a resistor. Actually I just added a resistor to those resistors already present at the particular spot. I put a 10 ohm resistor between the short legs of R7 and R8 and one between the long legs of R9 and R10.


And bingo!! The noise is almost completely gone, while the output is still loud and clear!


mandag den 10. februar 2014

Emagic amt8 USB MIDI interface


I always liked that blue colour!

When using lots of external MIDI devices, a dedicated multiport interface definitely is a must have. The Emagic (the creators of Logic) line of interfaces includes the Unitor8, Unitor8 mk-II, amt8 and mt4. They have USB and serial connections for mac and PC, except for the original Unitor8, that only has serial. The Unitor8 units have some extra timing features (like smpt) but, I don't know much about that. I don't think it is of much use these days. I got the the amt8 with 8 MIDI ports, USB and serial. It also has the ability to work in stand alone mode, so you don't have to run your synths through a DAW, but have direct access to your MIDI devices. All you have to do is push and hold the patch/panic button until the lights blink, and you will be in stand alone mode. Repeat the procedure and You are back in normal MIDI interface mode.

This interface, by many seen as outdated, is actually still supported in OSX 10.9 and runs perfectly in this environment, probably because Apple bought Emagic in 2002. The original pref pane, however, has not been working since OSX 10.4. Fortunately there is a solution for this...
Kurt Arnlund has written his own pref pane that works from OSX 10.5 and up and it is available for free from his site. You need this pref pane to program the MIDI interface for stand alone mode. He was also kind enough to email me an application to filter out certain sysex messages and generally very helpful. You can also find the user manual on his site.

Selecting patches for stand alone mode.

The Unito8 Pref pane icon


My unit was very cheap, just about 30 EUR, but it came without a power supply. The unit requires 9 VAC, which I had available on a broken Commodore 64 computer psu. These power supplies have both 9 VAC and 5 VDC and are known to fail on the 5 VDC line. I had one of those lying around with a faulty 5 VDC line, so now that works happily together with my Emagic amt8 :-) If you should come across a cheap unit without a powersupply, don't hesitate to buy it, since you could easily get a new one from a thrift shop or maybe ebay. Just make sure it is 9 VAC and 1000 mA.

Bargain alert!! If You own an amt8 or Unitor8 mk-II with USB, but need more than 8 MIDI ports, then you should look for an original Unitor8 without USB. Nobody wants these anymore, since they are practically useless with only serial connection, especially on the mac. So it should be quite possible to get one for a very decent price. Here is the trick: If you already own a unit with USB, then you can connect it to a unit without USB via serial cable. This way you would get 8 extra MIDI ports without using another USB port on your mac! And it's cheap too!! You can chain up to 8 units together this way.

All in all, this unit is rock solid and highly recommended. I am definately looking out for an original Unitor8, to get those eight extra MIDI ports.


tirsdag den 4. februar 2014

AKAI sample transfer


So, how to get sounds into the memory of the AKAI you might ask... Well, there are many ways. My focus is on getting as smooth a workflow as possible using a mac computer with the newest version of OSX (10.9 Mavericks at the time of writing).
Remember floppy disks? Those little plastic things that aren't so floppy, unless you take the actual disk out of the case... Normal DOS formatted 3.5" floppies have a capacity of 1.44 Mbytes, while AKAI formatted floppies have an insane capacity of 1.6 Mbytes!! Floppy drive is the only permanent storage option you have on an unexpanded AKAI S3000XL. So floppy it is...
As far as I know, there is no way of making an AKAI floppy with a mac. Not even one that is old enough to have an internal floppy drive (that's very old!). I have an old PC that can be used for writing floppies, which is necessary as USB floppy drives, unfortunately, are not capable of writing AKAI floppy disks.

After doing a fair bit of research, I've found that there a lots of ways of transferring samples to an AKAI sampler. The following are some of the possible ways of transferring samples to the AKAI S3000XL. I'm sure it can be done in more ways.

Floppy disk (only internal PC floppy)
  • Omniflop (Reading and writing of images)
  • Teledisk (Ancient dos program to archive floppies)
  • Akaidisk (Transfer samples to floppy, Windows 98 required)
  • EMXP (Transfer all necessary files to floppy, Windows XP and Omniflop driver required)

SCSI (smdi)
  • External Hard drive (requires PC with SCSI card)
  • Compact Flash adapter (requires SCSI to IDE adapter and IDE to CF adapter, sweet but expensive)
  • External CD-ROM drive (requires USB drive for mac and SCSI drive for AKAI)
  • External ZIP/JAZ drive (requires USB drive for mac and SCSI drive for AKAI)
  • Hooking up to PC with SCSI card and transferring samples via SMDI using MESA software (developed by AKAI), Chickensys Translator, AWave Studio. It might be possible on a mac with one particular USB to SCSI adapter, but it's too expensive to be of interest.

MIDI (sds)

Resampling
  • Just play the audio and sample it in the AKAI. Doesn't really require anything special...


Here are my favorite workflows:

MIDI (sds)
  1. Prepare samples in Audacity or your favorite audio editor (if necessary).
  2. Send samples to AKAI using C6.
  3. Edit program on AKAI S3000XL.
  4. Save to floppy.

Pros:
  • All you need is your Mac, AKAI and MIDI interface.
  • C6 is a native OSX application with a normal modern feel.
  • It's free.

Cons:
  • Sample names are not preserved after transfer.
  • You have to do a lot of editing on the AKAI after transfer.

Floppy disk
  1. Prepare sample and programs in AWave Studio.
  2. Save instrument as AKAI S1000 instrument.
  3. Rename .s and .p files to .aks and .akp with NameChanger.
  4. Copy files to USB stick.
  5. Fire up vintage PC with floppy drive.
  6. Format AKAI floppy and transfer files with EMXP.


Pros:
  • AWave Studio is a Windows application, but fortunately it installs fine with Wine Bottler.
  • Everything can be made right on your mac in AWave Studio. Setting up sample collections, setting up programs, editing samples, making loops etc.
  • For basic sounds, no editing is required on the AKAI, once your are familiar with AWave Studio.
  • Sample names are preserved.

Cons:
  • AWave Studio is natively Windows only, so you have to fiddle with Wine Bottler.
  • Big old PC with floppy drive is required. (An old laptop with floppy drive would be handy here...)
  • Many steps involved in the process.
  • AWave Studio is shareware. There is a free trial for 30 days.


mandag den 3. februar 2014

What a bargain!!

I've had my trusty old Formac 19" VGA monitor for a long time (Also bought 2nd hand of course!). It has served me well for about 7-8 years on two generations of Mac Minis, but now it finally went to monitor heaven... So what to do?

My old 19" display (picture from web)


  • Get an ordinary PC kind of standard DVI monitor? Well, I have to admit I'm a sucker for Apple design, there is just something about that white plastic and aluminum that is so, well white and plasticky... So a generic PC monitor was out of the question.
  • Get one of those new absolutely gorgeous Apple displays. Yes thanks! Uhm, not so fast... That's WAY over my budget!
  • But here's the solution! Some years ago, before HDMI, DVI or Thunderbolt was standard on Macs, Apple made a line of Cinema Displays with ADC connectors. These Connectors actually contained Power, DVI and USB. Since nothing can use that kind of connector today, nobody wants these displays. But that obsolete connector contains DVI, so naturally it is possible to use these monitors on a modern computer. This is what i found for 40 EUR on the danish equivalent of ebay called dba.dk:


My 23" Apple Cinema Display


I was very lucky with this one, since it came with an Apple ADC to DVI converter box. That way it worked right away, using the DVI to HDMI adaptor that came with my 2013 Mac Mini. Even without the converter box it would have been possible to make my own adapter by cutting of the ADC plug and wiring it up for power and DVI.

Here is the ambitious way of doing it:

And here is the cowboy way of doing it:

So that's a real bargain for a 23" widescreen display with great picture quality. But you have to do some hacking, if you're not lucky enough to get a display that comes with the converter box. I have spotted the converter box alone some places, but it is generally way too expensive to be interesting, but that may also change, since demand is so little.

lørdag den 1. februar 2014

AKAI S3000XL

AKAI S3000XL


The AKAI series of samplers from the 80's and 90's has always fascinated me, but I suppose when they were hot, I was so young that I could only dream about owning such an awesome piece of equipment. Well... Times have changed and a few  months ago I was able to pick up one of these beauties for the ridiculous price of 50 EUR!!
This unit has got floppy drive, scsi port, s/pdif, 8 individual outs and 16 Mb ram. It is in excellent condition and I'm generally very happy with it.
Anyway, since I'm not really into collecting things just for the sake of owning them, I had to consider how I would actually put the unit to good use.

Here are the main reasons:

  • My Audio interface (NI Komplete Audio 6) has 6 Inputs and two of those Inputs are digital. The S3000XL has s/pdif in and out, so I figured it would be a cheap way to get two extra inputs. This could come in handy when tracking external MIDI sound modules in Cubase or Logic. I haven't gotten around to trying this out yet, but there is no reason it wouldn't work. And the S3000XL is so much cooler (and cheaper) in a rack than some digital to analog box.
  • Let's not forget that the S3000XL is a really good sampler with very nice envelope and filter sections, even though my unit does not have the optional extra filter card. Since my Mac Mini, although it is a 2013 model, is not exactly a powerhouse when it comes to audio production, I thought it would be an advantage to let it do some work as a drum machine sampler, instead of a virtual sampler, using up a lot of cpu power and ram. So whenever I feel like using some of those classic TR-808 or TR-909 sounds, I'll put a floppy in the S3000XL and let it do it's thing.
  • I like analog synthesizers from the 70's and early 80's but at the moment I only own a Roland JX-3P analog synthesizer. And to be honest I cannot justify spending those insane amounts of money on that kind of equipment (being the father of three!!). Again, here comes the AKAI S3000XL to the rescue! You can always find some samples of those sounds and transfer them to the AKAI. I know, it's not the real thing, but maybe it's the next best thing. For me, somehow it beats having those sounds in the computer... By the way, transferring stuff to the AKAI is a different story all together and I'll come back to that topic later.


fredag den 31. januar 2014

Welcome!

These pages are about my fascination with vintage gear and computers. It's also about being cheap and getting the most out of nothing! For the same reasons I find it extremeley satisfactiory to cook a good meal from leftovers and things already in the cupboards. Or making the white rack in the picture below from spare materials. All I bought was the rack rails, the rest was stuff I had laying around. It's about putting old gear to good use in a modern setting, and it's about not wasting good money on expensive stuff that can be replaced by yesterdays technology. I suppose I do it for these reasons:
  1. I'm cheap :-)
  2. I can't afford the newest stuff. 
  3. I like tinkering with old electronics.
  4. Recycling instead of buying new things.
  5. The fascination of bringing old and new together. 
My homemade rack

I put together this nice rack and filled it with some very nice pieces of equipment that I have bought rather cheap. In the picture you see:
1. Boss RDD-10 digital delay
2. Emagic amt8 MIDI interface
3. AKAI S3000XL sampler
4. Korg M3R sound module
5. Roland U220 sound module


Below the rack is the modern domain: A Mac Mini and a Native Instruments Komplete Audio 6 audio interface.

I thought it would be nice to document some of the things I find out along the way about all these lovely gadgets. And also some of the other stuff i have lying around. More on that later! I have become rather fond of MIDI sound modules from the 80's and 90's and I plan on adding more modules to my setup.

I hope You will enjoy reading about my experiences with my gadgets and feel free to share your thoughts or ask any questions.